It’s good practice to include the correct time signature and tempo in your MIDI files. By convention, the default time signature is 4/4 and the default tempo is 120 beats per minute. That’s what Gloria will assume if a MIDI file doesn’t include a specific time signature or tempo. That will play fine if the software that recorded the music also assumed a default tempo of 120 bpm, otherwise the music will play too fast or too slow. To eliminate any doubt, some MIDI editors will automatically add 4/4 and 120 bpm at the start of each file. You should set the time signature and tempo appropriate to the song at the very beginning of the file.
The process varies by program. Here is a sequence from Reaper.
- Click the Go To Start button. Check that the time display indicates the beginning (measure 1, beat 1, fraction 0). Note the default of 120 bpm and 4/4.

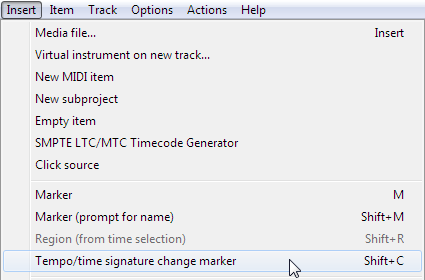
- Select <Tempo/time signature change marker> from the Insert menu.

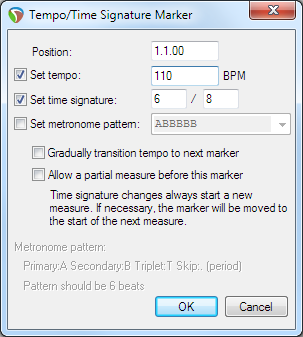
- Check both the <Set tempo> and <Set time signature> check boxes. Enter the new tempo and time signature (say, 110 and 6/8). Click OK. Even if the default tempo and / or time signature is what you actually want, set them here anyway. That way the MIDI file will have a definite, unambiguous tempo.

- Check the project timeline and confirm your new settings.

Setting the initial tempo in the MIDI file ensures the file will play back at the same tempo as it was recorded. Setting the initial time signature helps you keep time during recording, particularly if the editing software has a metronome function. It also alters the way Gloria uses the tempo setting during play. A “beat” means something different at 4/4 than it does at 6/8, informing what 110 beats per minute actually translates to.
If you have no idea what the time signature or tempo is supposed to be, insert a tempo / time signature marker at the start of the file for 120 bpm and 4/4 (the default). Record the music free-form, with no regard to measures or beats. It might look odd in the MIDI editing software and it’ll be a total mess if you try sheet music transcription (converting the recorded music into printed notes on a page). But Gloria will play it just as you recorded it.
Keep in mind that the tempo and time signature are reset at the start of every file. Let’s say you start with a MIDI file that includes intro, main verse, bridge and final verse all in one file, and then split the file into multiple files (intro, main, second version). While the music was in one single file, the current tempo remained in place until the next tempo change. If the tempo was set to 76 bpm in the intro, the main verse would continue with 76 bpm. When split into multiple files, the intro file would contain the 76 bpm tempo setting but the main file would not. So on playback the song would start with the intro at the expected 76 bpm, and then abruptly speed up to the default 120 bpm at the start of the verse. Thus, when splitting a MIDI file into multiple files for Gloria (and when creating those files from scratch), be sure to include tempo and time signature markers at the start of every file such that the timing is correctly carried over from one file to the next.
Upbeat
Sometimes a song will start on the upbeat (the last note of the previous measure). Here’s an example. Normally in 3/4 time each measure has three beats, but in this example the first measure only has one beat.

To represent this in the MIDI file, add a tempo / time signature marker at the start of the file (at 1.1.00) with a time signature of 1/4. Then one beat later (at 2.1.00) add a time signature marker of 3/4. Now the measure and beat numbers in the software will match the sheet music. This is what it looks like on the timeline:

Measure 1 has one beat, measures 2 and on have three beats.
This is not strictly necessary for Gloria. An initial tempo and time signature of 3/4 is sufficient for this example. However, adding the upbeat measure will help you match the MIDI file to the sheet music, as an aid to correctly transcribing the music into MIDI. It will also improve the results when converting the MIDI file into sheet music later on, if that’s something you might want to do.
Slowing Down
Music sometimes has “rit.” or “rall.” written above the staff to indicate a slowing of the tempo. “rit.” for ritardando (an Italian musical term) is often used in the middle of the song to slow it down temporarily, while “rall.” for rallentando is used at the end of the song to slow it to a close. People naturally slow down at the end of a song anyway (specifically at the end of each verse / chorus) even when there’s no such indication in the music.
The way to properly represent that in a MIDI file is to insert a series of tempo markers to gradually slow down the tempo of the song. Here’s an example, where the song’s normal tempo of 168 bpm is slowed to 105 bpm over the course of four measures.

Again, this is not strictly necessary for Gloria. If you slow down while recording the music then that’s what will happen when you play back the music. But adding the rit. / rall. as a tempo change will help with proofreading the MIDI file because the notes will line up with the measures and beats. It will also help get better sheet music from the MIDI file. If you’re taking a sheet music file from another program and exporting it as MIDI, inserting a series of tempo markers to the MIDI file is the quickest way to add rit. / rall.
You can follow the same process on a smaller scale for a fermata, where only one note is lengthened.

End of File Marker
MIDI files have a specific, definitive, accurate way to indicate when the music ends. It’s important to know when, in time, the music should end, as opposed to running out of data and stopping there. With Gloria it’s especially important because files are chained together, played one after the other. The intro file flows into the main file. The main file loops back to the beginning at the end of each verse. All of these transitions depend on the end of file marker to be on the beat, to prevent faltering or unexpected silences between verses. Tempo must be maintained throughout with seamless transitions between files. If not, the user will have difficulty singing along.
Fortunately, all MIDI editor programs include a required end of track marker. Unfortunately, none of them consistently get it right. Thus, the MIDI end of track marker is not generally suitable for Gloria. You will have to add a Gloria-specific end of file marker to each MIDI file you create.
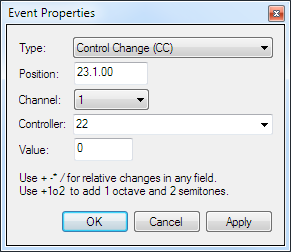
This marker is MIDI Continuous Controller (CC) 22, with value 0. Place this command on only one channel (any channel will do, but it’s typically placed on channel 1, Melody) at the beat following the last note in the music, usually the start of the next measure. Here’s an example of how to add the Gloria end of file marker (using Reaper):

The event type is CC; the position (in time) is measure 23, beat 1; the event is on channel 1; it’s controller 22 with value 0. This means that the next file will start (measure 1, beat 1) at exactly measure 23, beat 1 of this file. This is what it looks like in the event list for channel 1:

Note that the MIDI end of track marker is also at measure 23, beat 1 (it can never come before the last event in the track). Compare with the event list for channel 2:

Here the MIDI end of track marker is at measure 22, beat 3 and a half (roughly). That’s half a beat too soon. The current verse would end and the next verse would start playing before the listeners expected it. Singers would hesitate before re-aligning with the new timing and the congregation would falter. Thus, it’s important to add a Gloria end of file marker at the right place.
Gloria will stop playing a file and immediately move on to the next file as soon as it encounters the CC 22 event. There may be more events still to play later in that track and there may be more events on other tracks. They are all discarded. If the file does not have a CC 22 event Gloria will play everything in the file until the final (latest) MIDI end of track marker, before moving on to the next file.

